How to deploy your Eleventy website to GitHub Pages with GitHub Actions
I've been thinking about starting my own blog for several years now. I kept putting it off, but a few weeks ago I finally got to it. In this article, I explain how to set up a skeleton Eleventy website, push it to GitHub and with the help of GitHub Actions publish it on GitHub Pages.
This article assumes you have GitHub account and a basic knowledge of executing NPM and Git commands in your terminal.
Before I started on the development I made a list of requirements:
- create a fully static website
- be able to write my blogs in markdown
- host it on GitHub Pages
- use GitHub Actions for CI/CD
So after evaluating a few static site generators I picked Eleventy. The reason I'm using a static site generator is because it generates a full static HTML website. This has a positive impact on the performance of the website, plus there is no need for a backend or database.
The basic setup
Create a new folder and initialize it with the following command. This creates a package.json file in your directory.
npm init -yFor now, I'm going to stick to the bare minimum for this setup. In a follow-up blog post I'll be adding some extra features.
npm install @11ty/eleventy@latest sass@latest --save-exactAfter the packages are installed, open the package.json file and add these commands inside the scripts tag.
"watch:sass": "sass src/static/scss:public/static/css --watch",
"build:sass": "sass src/static/scss:public/static/css",
"watch:eleventy": "eleventy --serve",
"build:eleventy": "ELEVENTY_ENV=development eleventy",
"start": "npm run watch:eleventy & npm run watch:sass",
"build": "npm run build:eleventy & npm run build:sass"
To be able to run our Eleventy skeleton we need to add a few things first. Create the following folder structure.
- src
- _includes
- static
- scss
When you've done that, create a .eleventy.js file in the root folder and give it this content.
module.exports = function (eleventyConfig) {
  eleventyConfig.setBrowserSyncConfig({
    files: './public/static/**/*.css',
  });

  return {
    dir: {
      input: 'src',
      output: 'public',
    },
  };
};
The .eleventy.js file is where all the configuration is done. Here we'll also define things like filters, add plugins, etc... The current configuration reloads the website whenever a change is made to our scss. Secondly, the compiled scss output is served in the public/static/css folder.
Now let's add the last 3 files so we can get up and running. First create a file called main.scss and put it in the static/scss folder. Secondly create a template file called base.njk and put it in the _includes folder, you can give it the content below.
Eleventy has built-in support for the Nunjucks templating language.
<!DOCTYPE html>
<html lang="en">
  <head>
    <meta charset="utf-8" />
    <title>{{ title }}</title>
  </head>
  <body>
    {% block content %} {{ content | safe }} {% endblock %}
  </body>
</html>
Lastly add a index.md file in the src folder with this content and run the npm run start command in your terminal.
---
layout: 'base.njk'
permalink: /
title: 'My Eleventy Website'
---

# Hello World!
The output in your terminal should look like this.
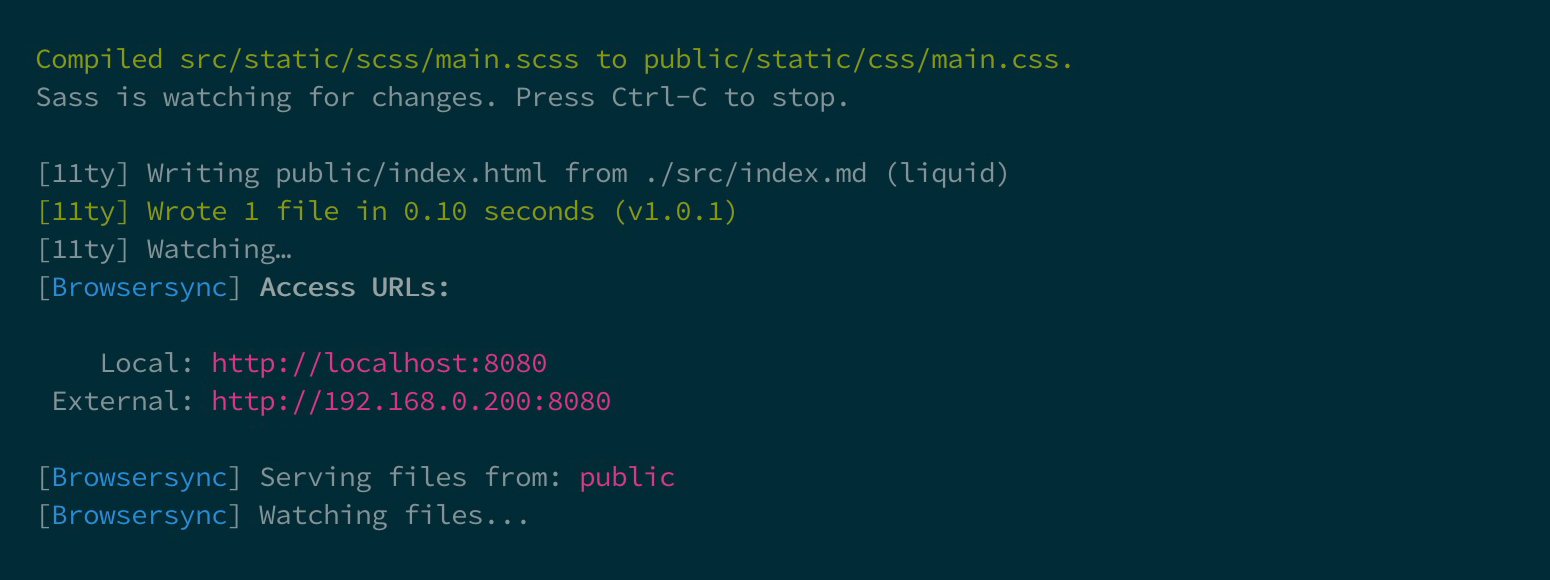
Open a browser and navigate to localhost:8080, it should show Hello World! on the page. To make sure that the styling of our website is properly rendered lets modify the base.njk by adding the url to our stylesheet inside the <head> tag.
<link rel="stylesheet" type="text/css" href="{{ 'static/css/main.css' | url }}" media="screen" />Let's do something crazy and add this to main.scss and go back to the browser to see the result. Because of setBrowserSyncConfig in our config the browser should automatically refresh.
h1 {
  color: orange;
  background-color: darkblue;
  text-align: center;
  padding: 10px;
}
Push our code to GitHub
First create a .gitignore file in the root folder, so we don't push unnecessary files to the repository.
# Dependencies
/node_modules
# Misc
/public
# Intellij
/.idea
# Sass
.sass-cache/
*.css.map
*.sass.map
*.scss.map
# Visual Studio Code
/.vscode
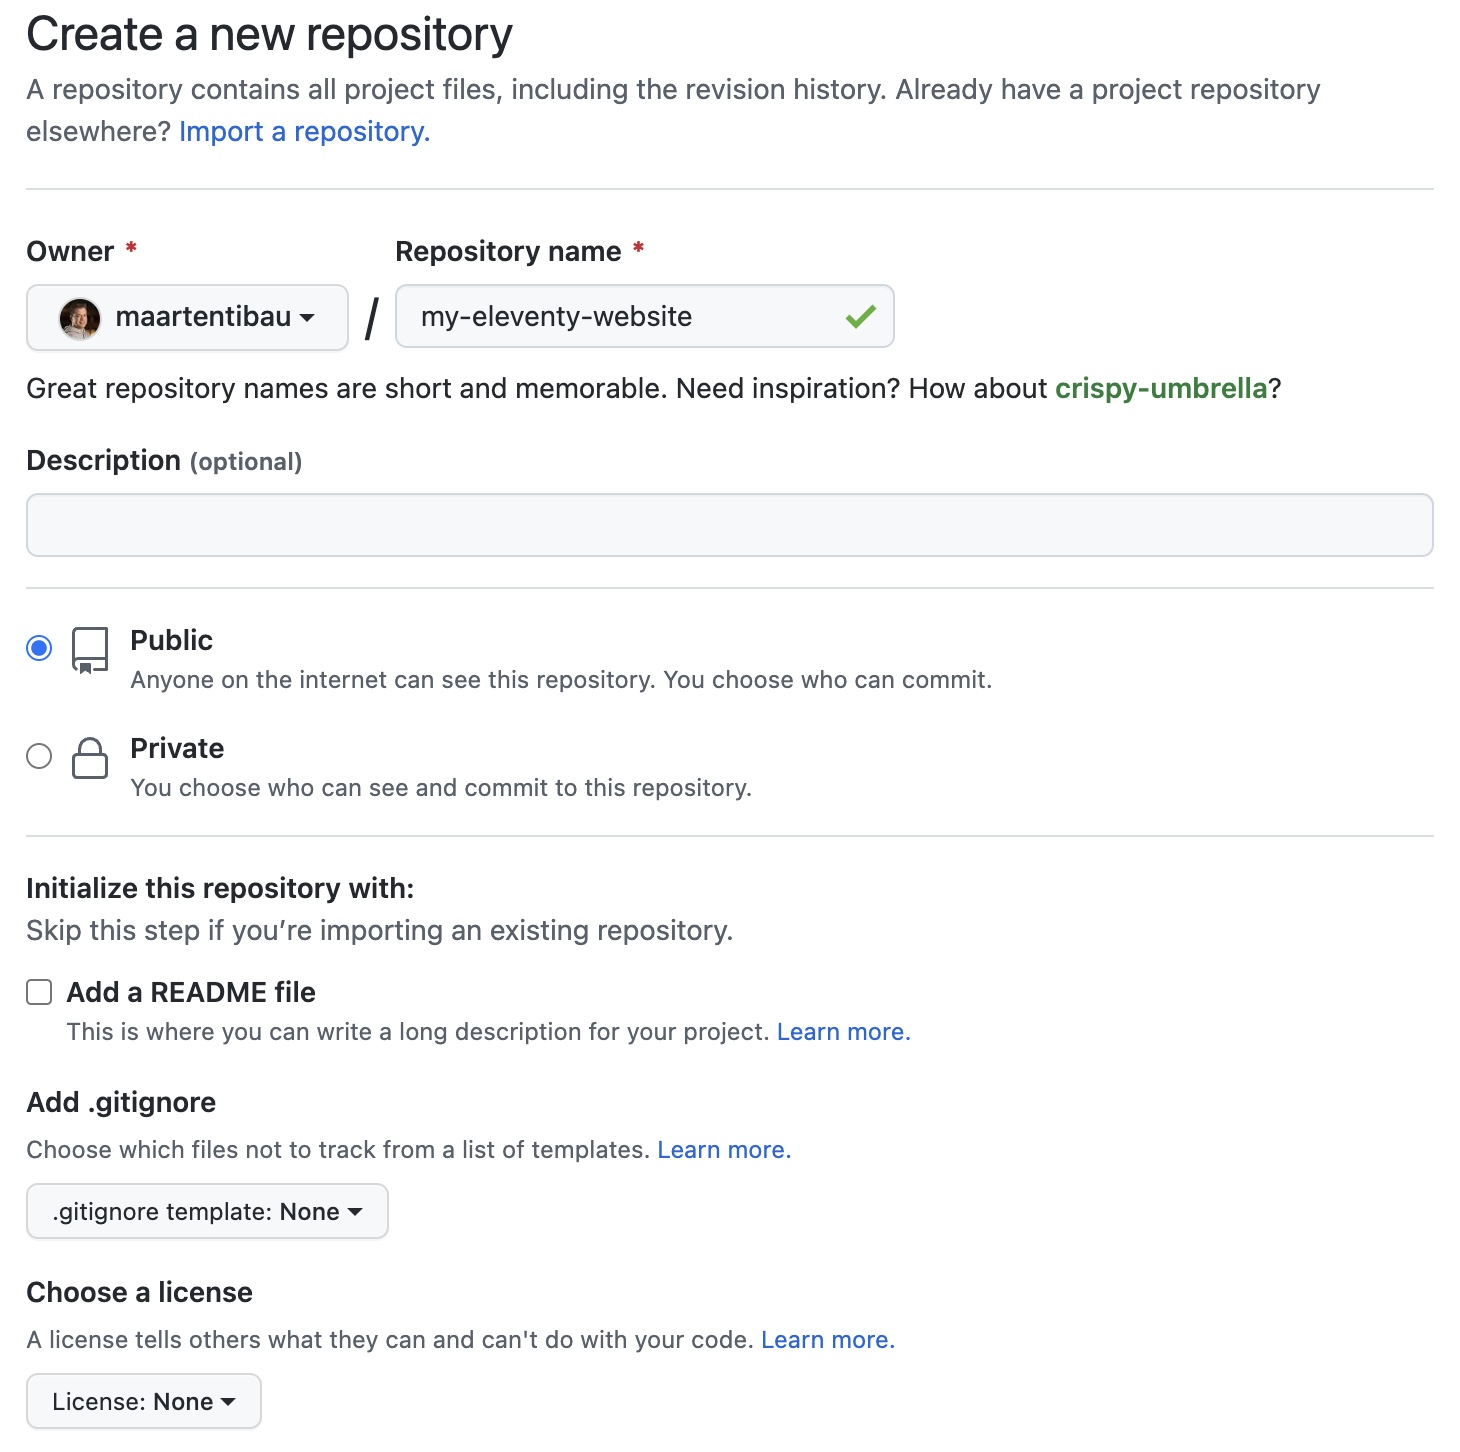
.historyHead over to GitHub and create a new repository called my-eleventy-website. Don't add a README, .gitignore and LICENCE, they should be unselected by default.
Go into the root folder of your project and perform the following commands. Make sure to adjust the parts between {{ ... }}
git init
git add .
git commit -m "first commit"
git branch -M {{ your default branch }}
git remote add origin https://github.com/{{your-github-username}}/my-eleventy-website.git
git push -u origin {{ your default branch }}
Setup GitHub Pages
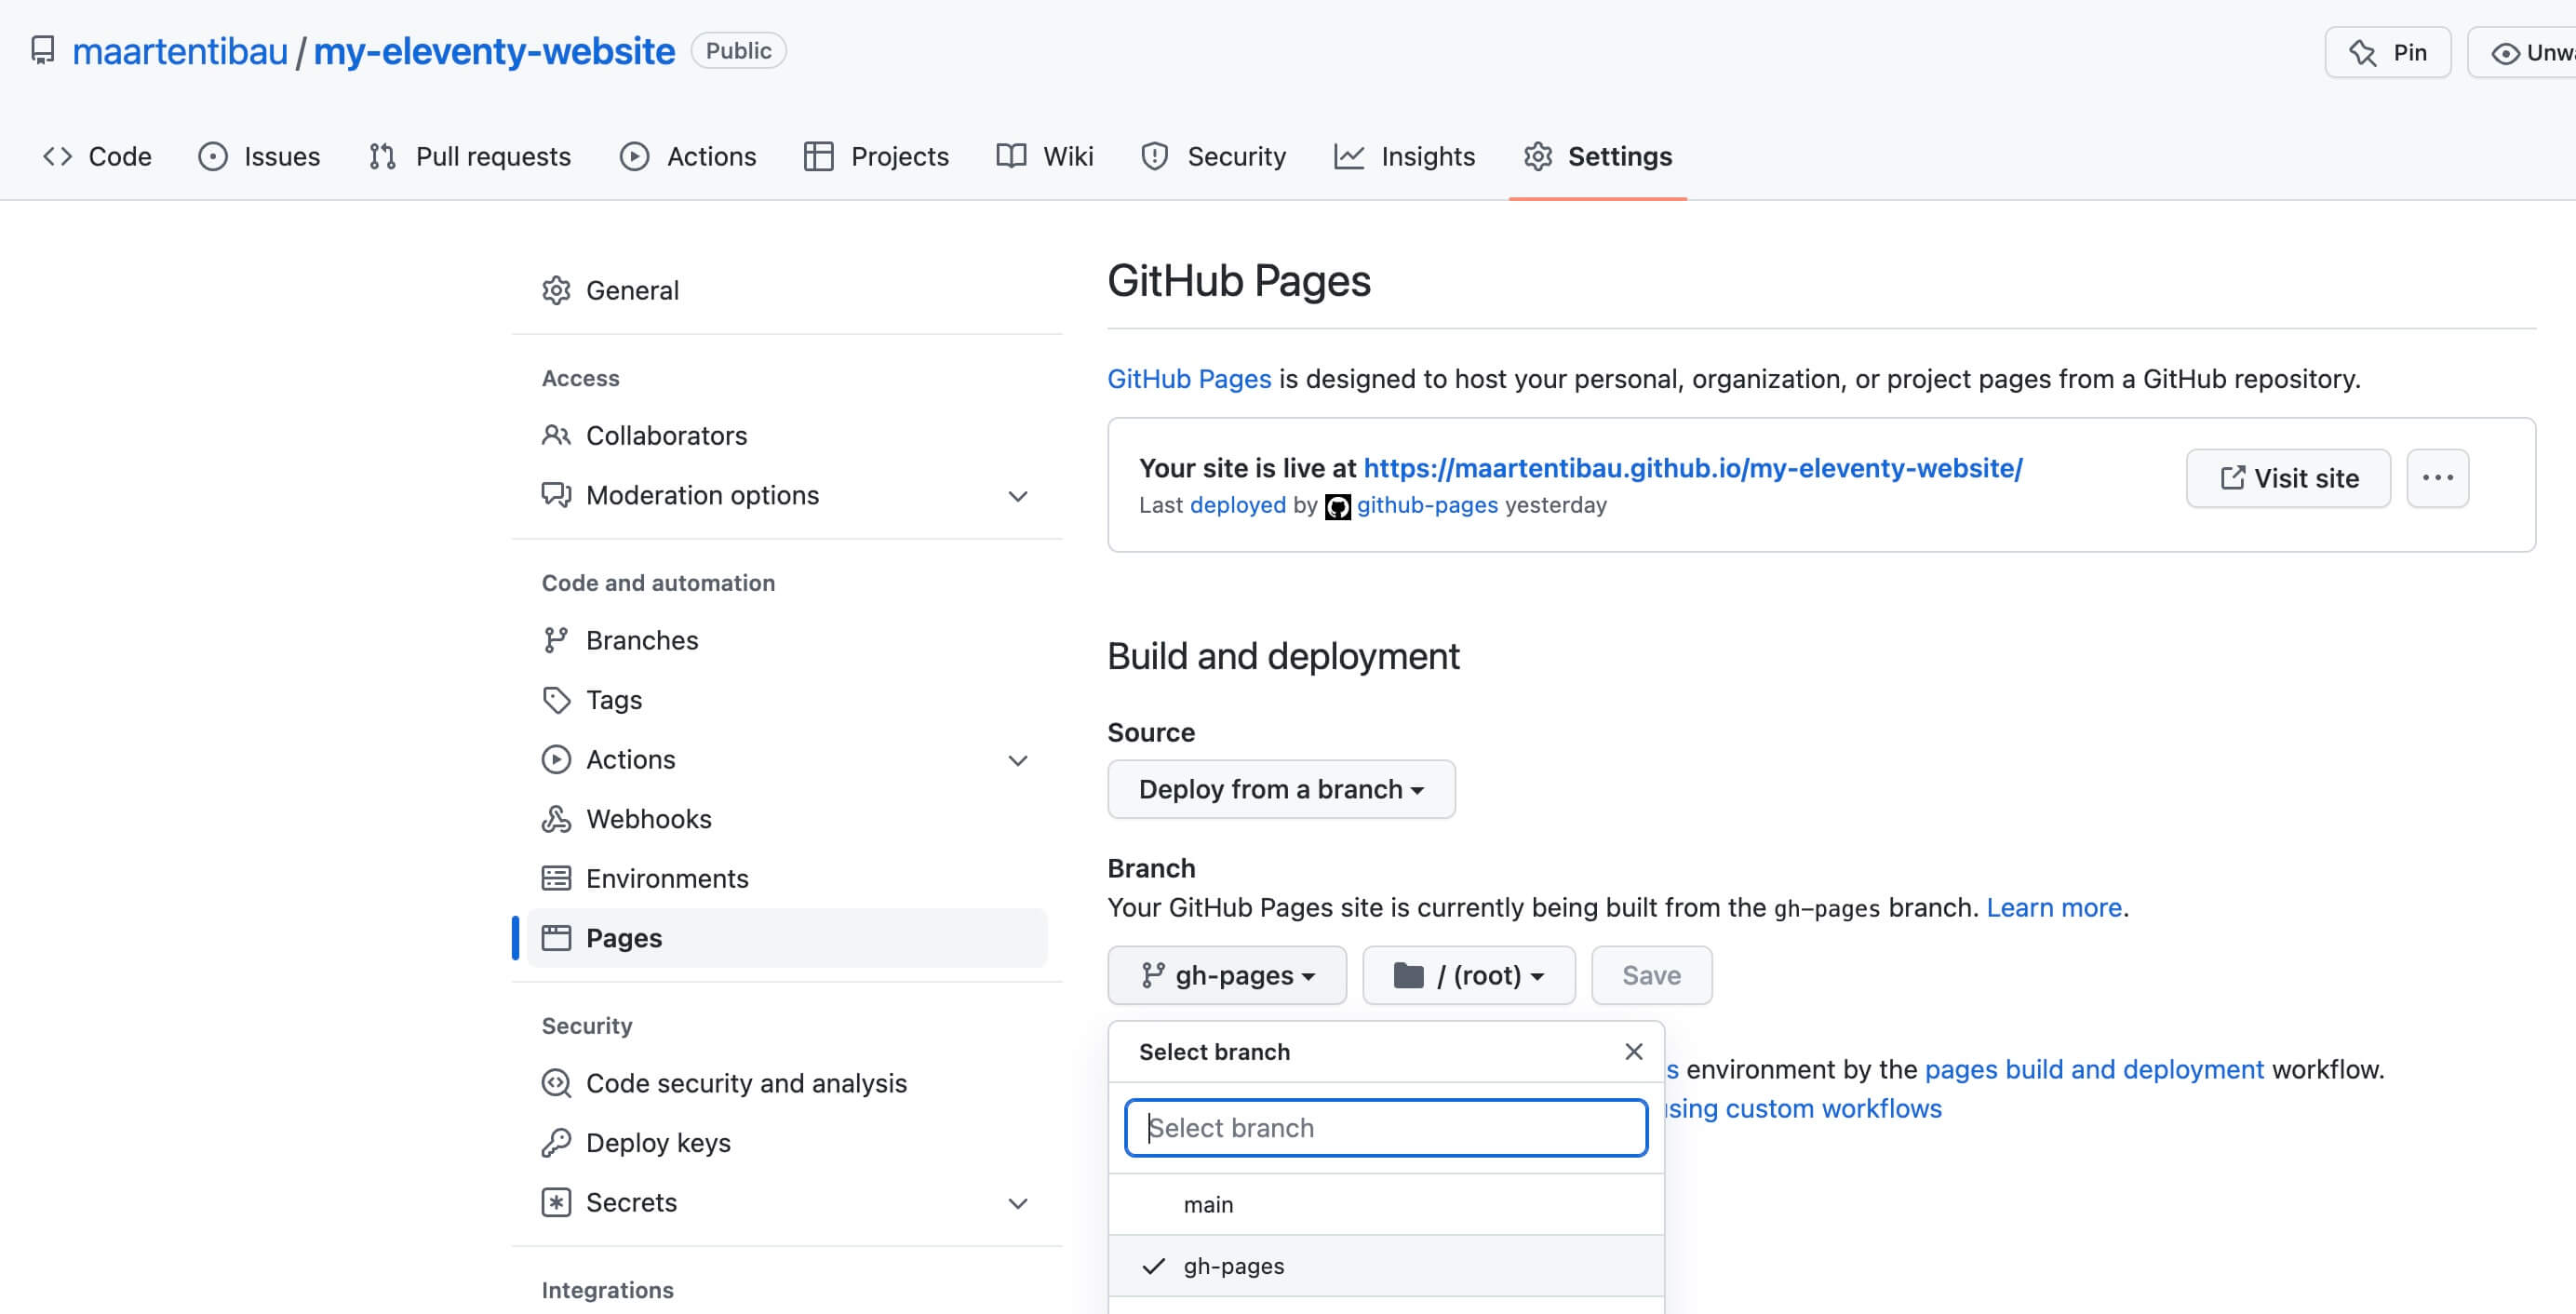
Alright, now that our repository is created we can enable GitHub Pages. Go to the page of the repository you've just created and click on the settings button in the top right.
Click on the Pages button and select your default branch in the dropdown, probably this is main or master, leave /(root) as the selected folder. Click on save to confirm the settings.
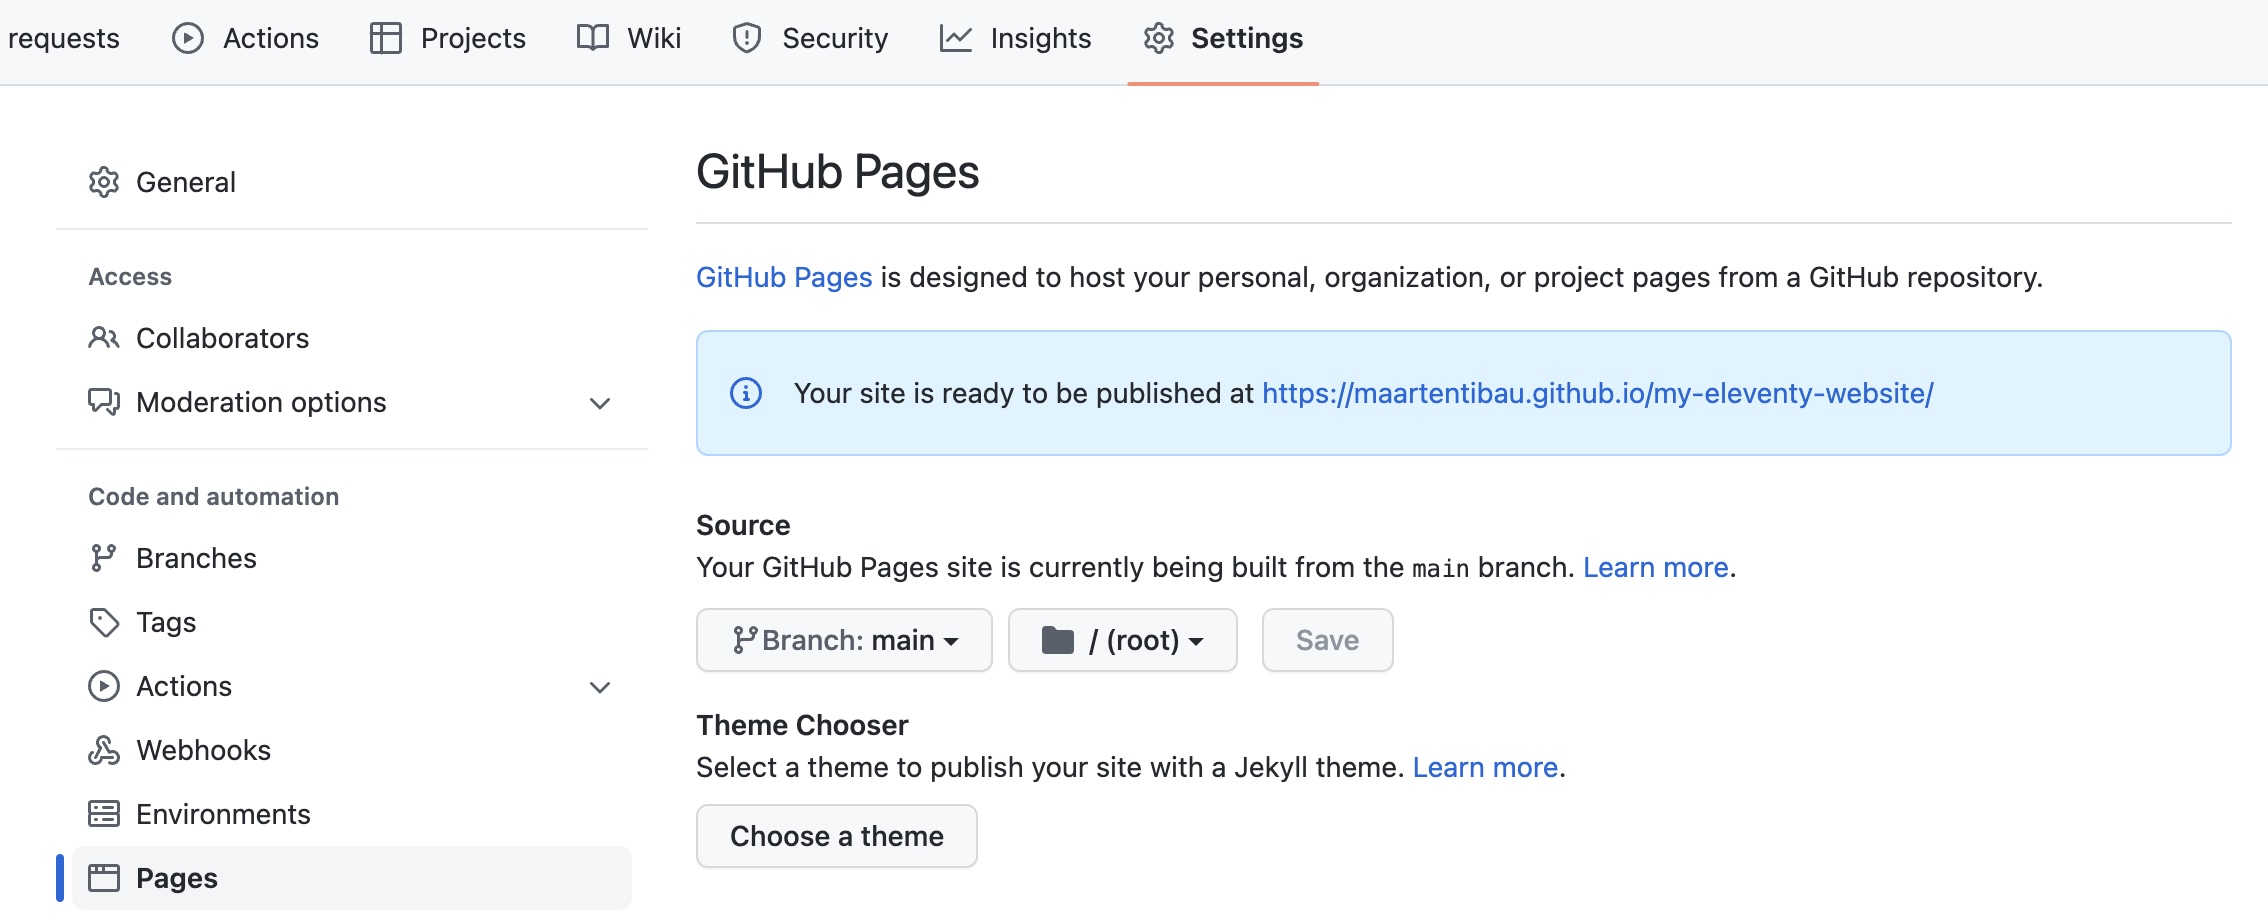
Once you've done this a message should appear with the URL where your website is published.
Build your website with GitHub Actions
By default, GitHub pages uses Jekyll to generate your website. In our case we're using Eleventy, so we want to inform GitHub Pages about this. To do this, create an empty file called .nojekyll and put it in the root directory.
Next create .github folder also in the root directory and inside that folder create another folder called workflows. In this folder we put the workflows which are executed by GitHub Actions.
We're going to create 2 workflows, the first one performs a build when a pull request is created. Create a file with the name build.yml. If your default branch is something other than main make sure to change this in the branches array.
This workflow only performs a build and not yet deploy your changes. This way there is a fail-safe solution.
name: Build on PR

on:
  pull_request:
    branches: ['main']

jobs:
  build:
    runs-on: ubuntu-latest

    strategy:
      matrix:
        node-version: ['14.17.6']

    steps:
      - uses: actions/checkout@v3

      - name: Use Node.js ${{ matrix.node-version }}
        uses: actions/setup-node@v3
        with:
          node-version: ${{ matrix.node-version }}
          cache: 'npm'

      - name: Install packages
        run: npm ci

      - name: Run npm build
        run: npm run build
Next create build-and-deploy.yml. As the name of the file already suggests, this workflow builds and deploys our website to GitHub Pages when a push is done on main branch, for example when you merge a PR.
name: Build & Deploy

on:
  push:
    branches: ['main']

jobs:
  build:
    runs-on: ubuntu-latest

    strategy:
      matrix:
        node-version: ['14.17.6']

    steps:
      - uses: actions/checkout@v3

      - name: Use Node.js ${{ matrix.node-version }}
        uses: actions/setup-node@v3
        with:
          node-version: ${{ matrix.node-version }}
          cache: 'npm'

      - name: Install packages
        run: npm ci

      - name: Run npm build
        run: npm run build:prod

      - name: Deploy to gh-pages
        uses: peaceiris/actions-gh-pages@v3
        with:
          deploy_key: ${{ secrets.ACTIONS_DEPLOY_KEY }}
Before we can use this workflow we'll need to create an ACTIONS_DEPLOY_KEY. This key is needed to be able to deploy our generated code to GitHub Pages. Follow the steps that are described in these docs to create an ACTIONS_DEPLOY_KEY.
Now let's add extra commands to our scripts property in the package.json file when running our build on GitHub.
"build:sass:prod": "sass src/static/scss:public/static/css --style compressed",
"build:eleventy:prod": "ELEVENTY_ENV=production eleventy",
"build:prod": "npm run build:eleventy:prod & npm run build:sass:prod"
Once that is done we can push all the changes to our repository and let the magic happen!
git add .
git commit -m "build and deploy"
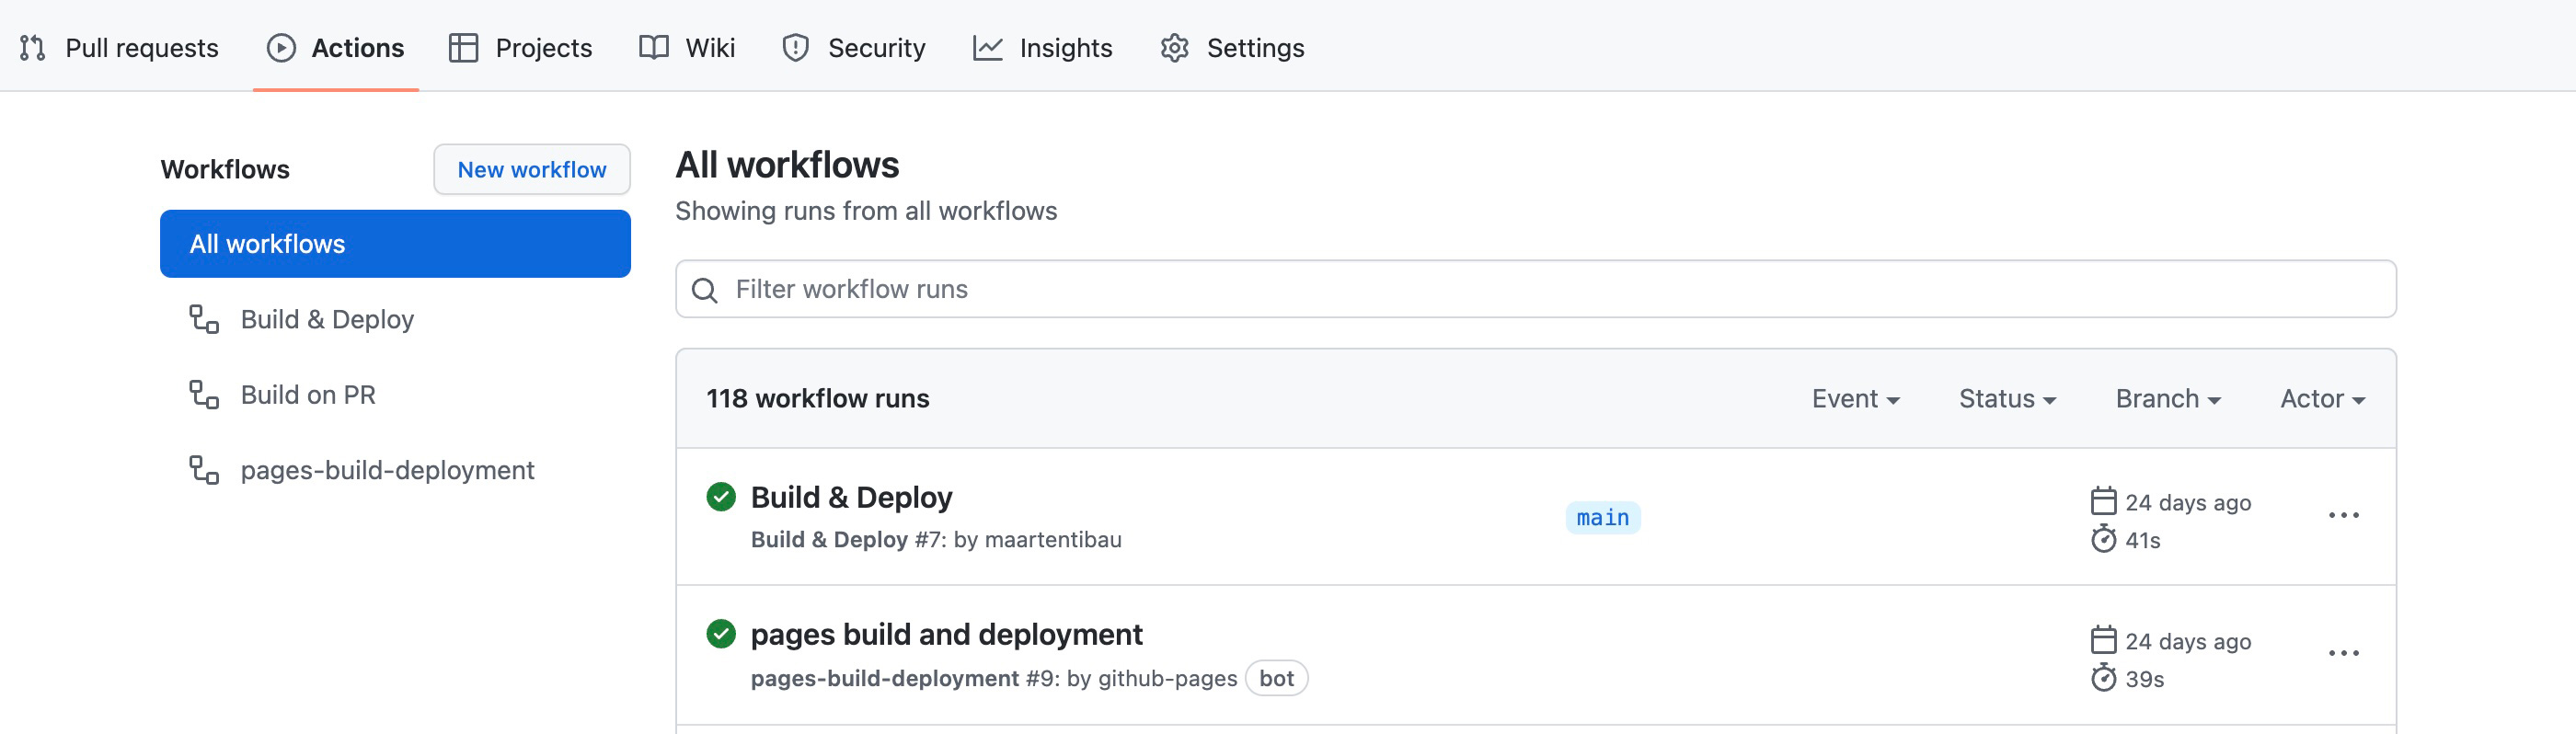
git pushNow head over to your repository on GitHub and click on the Actions tab on top. Normally you should see the Build & Deploy workflow being executed, once that is done another workflow called pages-build-deployment is triggered and deploys the generated website to GitHub Pages.
After the Build & Deploy workflow is executed a new branch called gh-pages is auto-created. In this branch the generated output of your Eleventy site will be stored. To be able to host the website properly we need to inform GitHub Pages about this. Navigate to the Settings tab and select Pages in the list on the left. Change the branch from which your GitHub Pages site is currently being built to gh-pages and hit save.
The pages-build-deployment workflow will be automatically triggered again and after it has finished you can navigate to the URL where your website is published to see the final result. You've done it!
Conclusion
In this blog post, I've explained how to set up a basic Eleventy website, create workflows to build it via GitHub Actions and finally publish it on GitHub Pages.
The complete source can be found in this repository on GitHub
In a follow-up post I'll dive a bit deeper into creating an actual blog with Eleventy and some things I learned along the way, so stay tuned for more content!
Notice a typo or some other issue? Feel free to submit a PR.